In applications, environment variables are used to store sensitive information, such as API access tokens and other critical configuration values, which should not be exposed to end users. When developing an application locally, it’s common practice to use a .env file to securely manage these values. This approach allows developers to set environment-specific configurations without hard-coding sensitive information directly into the source code or committing them to public repositories like GitHub. However, when you push the application to your production environment, you need a way for the server to access those values while maintaining their secrecy. This guide documents how to add or update these variables to Amazon Web Services (AWS) where the SIMS Portal is hosted.
ECS Cluster
The SIMS Portal is bundled into a Docker image, which is stored in AWS’s Elastic Container Registry (ECR). This image is then deployed using AWS’s Elastic Container Service (ECS), which ultimately serves the application to end users.
Environmental variables are accessed by the server through ECS’s “Task Definitions”. Each time you need to change or add a variable, you need to create a new “Revision” of those tasks. The tasks definitions are stored in JSON format, and look something like this (sensitive information redacted):
{
    "taskDefinitionArn": "arn:aws:ecs:us-east-2:**************:task-definition/simsportal:11",
    "containerDefinitions": [
        {
            "name": "flask",
            "image": "***********.dkr.ecr.us-east-2.amazonaws.com/simsportal:latest",
            "cpu": 0,
            "portMappings": [
                {
                    "name": "flask-5000-tcp",
                    "containerPort": 5000,
                    "hostPort": 5000,
                    "protocol": "tcp",
                    "appProtocol": "http"
                }
            ],
            "essential": true,
            "environment": [
                {
                    "name": "GOOGLE_MAPS_API_TOKEN",
                    "value": "*******************"
                },
...
At the bottom of this snippet, you’ll see the environment key, with a list of dictionaries inside it, each with a name referring to the variable used by the SIMS Portal, and the value associated with it. In this example, anywhere that the Portal needs to pass the Google Maps API token for interacting with Google’s servers, it comes to this file to grab the value.
Example Workflow to Add a New Variable
With an understanding of how AWS manages these variables, let’s walk through a simple example, starting with the SIMS Portal code itself. I’ve developed the Portal in Flask, and a common convention for managing variables inside a Flask app is to use a config.py file. Anywhere that the code needs to reference a secret value, it first references the corresponding value here. It looks something like this:
import os

class Config:
	DEBUG = True
	SECRET_KEY = os.environ.get('SECRET_KEY')
	SESSION_TYPE = 'filesystem'
	SESSION_PERMANENT = False
	SQLALCHEMY_DATABASE_URI = os.environ.get('SQLALCHEMY_DATABASE_URI')
	CONSUMER_KEY = os.environ.get('CONSUMER_KEY')
	CONSUMER_SECRET = os.environ.get('CONSUMER_SECRET')
	ACCESS_TOKEN = os.environ.get('ACCESS_TOKEN')
    SIMS_PORTAL_SLACK_BOT = os.environ.get('SIMS_PORTAL_SLACK_BOT')
    ...
So when the system needs to fire off a Slack message, it will access it via the config file like this: token = current_app.config['SIMS_PORTAL_SLACK_BOT']. When working locally, the os.environ.get() grabs the value from your local (and never committed to GitHub!) .env file. But in production, the app will look for the value inside your task definition JSON file.
Let’s pretend we need to add a value in production.
Create New Task Revision

- Go to AWS’s ECS and click on Task Definitions > simsportal.
- You’ll see a number of revisions, each representing an update I needed to make. Click on the latest one (the simsportal:X where X is the highest number).
- Click Create New Revision. You can either do this as JSON or using the AWS GUI. I prefer JSON as it offers more control, but for the sake of this walk-through where we’re only dealing with the environmental variables and not touching any other settings, let’s use the GUI.
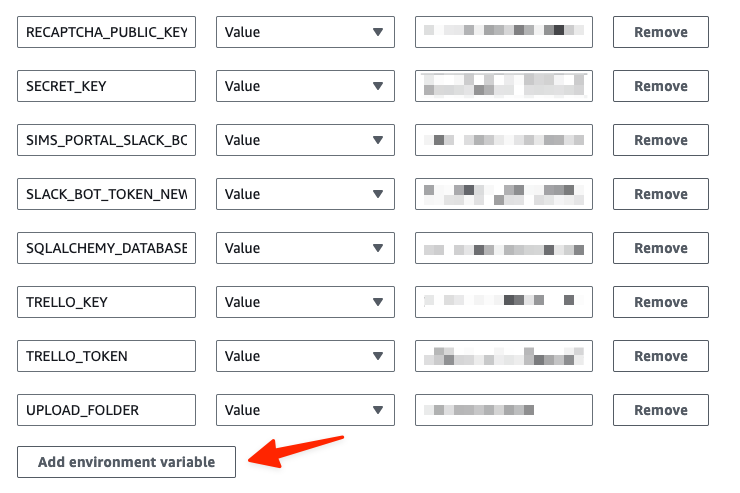
- Scroll down to the Environment Variables section, and click Add Environment Variable (see screenshot).
- Add the key and value just as they appear in your
config.pyfile (case sensitive—and convention is to use all caps). - You don’t need to change anything else, so scroll down and click Create.
Force Deployment Using Latest Revision
- Go back to Clusters on ECS and select the simsportal.
- Under Services, click SIMSPortal.
- Click Update Service at the top.
- On the next page, check the Force New Deployment box. Under Revision, select the latest version that you just created.
- Scroll down and click Update.
AWS will then drain the existing service and restart it. It balances traffic during this process and there should not be any service disruption.
