
SIMS is frequently asked at the beginning of a response to gather the locations of national society branches. Having access to this data can help the operation develop strategies that leverage the available resources at these locations. While some national societies may not have this information stored anywhere and thus require a more consultative data collection process directly with members of the national society, we sometimes find that the locations are posted to a public website in the form of local addresses. When that’s the case, we can use web scraping methods to collect the information quickly with simple Python scripts.
Scenario
The GO Platform is striving to be the centralized repository of global branch locations, and as part of that effort, I was asked to provide the American Red Cross’ branches. While my national society does maintain this information in an easily-accessible format, I’m using this walkthrough to demonstrate the process that can be replicated (with some tweaks) for other national societies that similarly post their branch locations to a website but might not have a simple CSV file that can be shared.
The American Red Cross branch site is divided by region, with each regional page then showing the sites located within that area. Here’s an example of what a given regional page looks like.
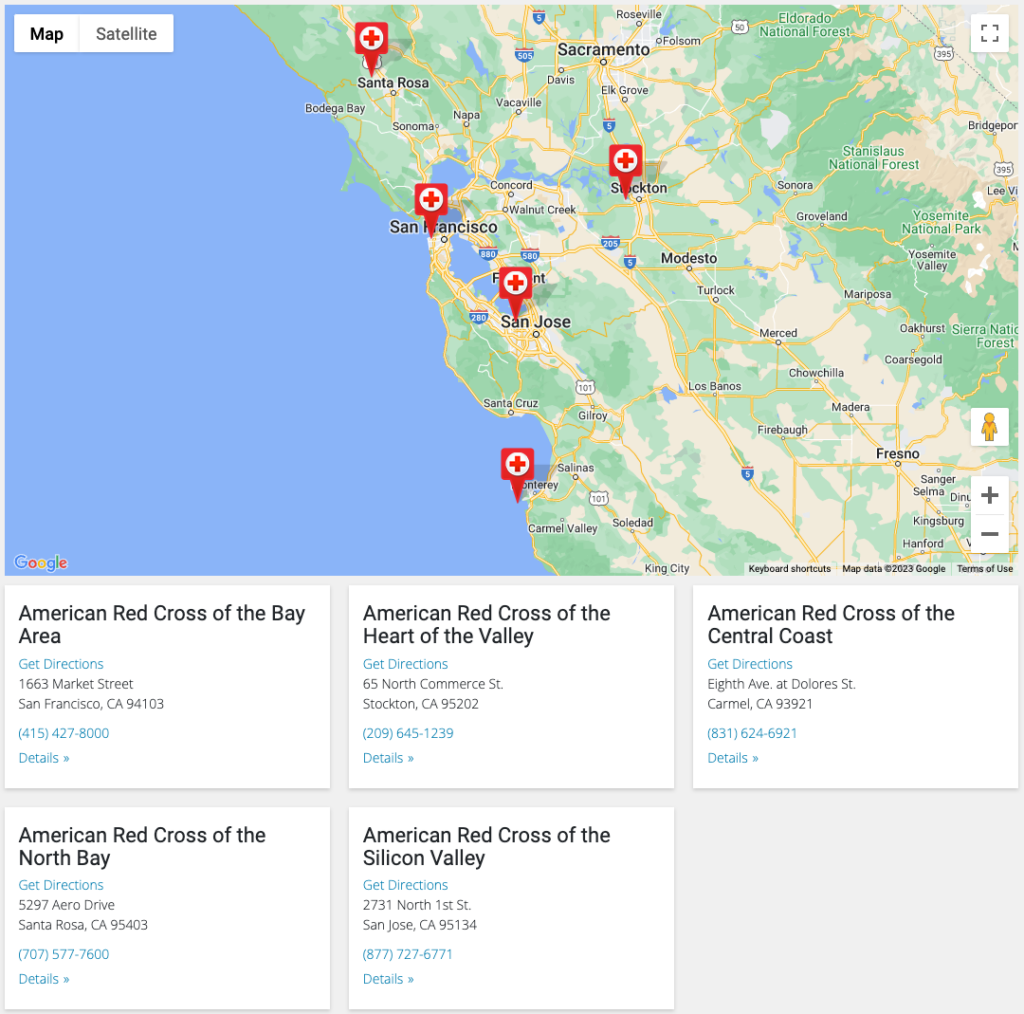
There are 73 pages like this, and more than 1,300 distinct locations! So doing this manually would be a slog, to say the least.
Considerations before starting
My solution does two things. First, it loops through all of these pages to grab the name of the location, the street address and city, and the phone number. Second, it takes that street address and passes it to the Google Maps API to get the exact coordinates of the site in order to facilitate mapping. This second step requires that you set up a free developer account with Google, and that you create a token. See this section of another geocoding guide on this learning site for directions on setting that up.
Verify that Python and PIP are installed
See this guide to make sure your Python interpreter is set up correctly and that you have the package manager PIP installed.
Source code
Before we dive in, it can be helpful to see the finished code. I’ve put the project on GitHub, where you can reference it as we walk through this process, or clone it to your computer so you can work with it directly inside your own code editor.
If you’d like to run the code yourself, the readme file has basic instructions under the usage section.
Building the script
Here is the completed script for reference, which we’ll walk through in detail:
import requests
from bs4 import BeautifulSoup
import csv
import googlemaps
from dotenv import load_dotenv
import os

# set to false if you don't want to set up geocoding, which requires a Google Maps API key
geocoding = True

list_urls = []
csv_file_path = 'amrc_location_urls.csv'
with open(csv_file_path, 'r', newline='', encoding='utf-8-sig') as csv_file:
    csv_reader = csv.reader(csv_file)
    for row in csv_reader:
        list_urls.extend(row)

print("Beginning web scraping\n------------------\n")

output = []
for url in list_urls:
    print(url)
    response = requests.get(url)

    if response.status_code == 200:
        soup = BeautifulSoup(response.text, 'html.parser')

        # all divs with class="location-card"
        location_cards = soup.find_all('div', class_='location-card')

        for card in location_cards:
            temp_dict = {}

            # location name
            h5_element = card.find('h5')
            if h5_element:
                temp_dict['name'] = h5_element.text

            # street info
            street_elements = card.find_all('street')
            for street in street_elements:
                temp_dict['street'] = street.text

            # city info
            city_elements = card.find_all('city')
            for city in city_elements:
                temp_dict['city'] = city.text

            # phone info
            phone_element = card.find('a', class_='card-phone')
            if phone_element:
                temp_dict['phone'] = phone_element.text

            output.append(temp_dict)
    else:
        print(f"Couldn't find that branch page. Status code: {response.status_code}")

if geocoding == True:
    # add your google maps key to a local .env file with key labeled: GOOGLE_MAPS
    load_dotenv()
    google_maps_key = os.environ.get('GOOGLE_MAPS')
    gmaps = googlemaps.Client(key=google_maps_key)

    print("Beginning geocoding process\n------------------\n")

    for place in output:
        joined_address = place['street'] + ' ' + place['city']

        geocode_result = gmaps.geocode(joined_address)
        try:
            place['lat'] = geocode_result[0]['geometry']['location']['lat']
            place['lng'] = geocode_result[0]['geometry']['location']['lng']
        except IndexError:
            place['lat'] = 0
            place['lng'] = 0

keys = output[0].keys()
a_file = open("amrc_branch_locations.csv", "w")
dict_writer = csv.DictWriter(a_file, keys)
dict_writer.writeheader()
dict_writer.writerows(output)
a_file.close()
Import the packages
import requests
from bs4 import BeautifulSoup
import csv
import googlemaps
from dotenv import load_dotenv
import os
If you followed the readme directions on the GitHub repo, you would have created a virtual environment and installed the dependencies. The key ones to flag here are:
requests: A library for making HTTP requests in PythonBeautifulSoup: A library that facilitates web scraping of sitesgooglemaps: The Google-produced tool for interacting with their APIdotenv: A tool for loading your.envfile, where your private Google Maps token will be stored (and not synced with GitHub)
The first few lines of the script import those libraries, as well as csv and os, which are built-ins with Python.
Turn geocoding on or off
# set to false if you don't want to set up geocoding, which requires a Google Maps API key
geocoding = True
The geocoding process—looking up each address’ latitude and longitude—is optional here. If you don’t want to do that part because it isn’t necessary for your own use case, or you don’t want to take the time to generate a Google Maps token, set this to False before running the script.
Getting the regional URLs
As mentioned above, the American Red Cross branch locations are divided into regional pages, and many national society pages likely organize their locations in a similar way. Depending on how many pages you’re dealing with, you may or may not need to grab them all manually. In my case, I held down the command key and clicked on each one to open each as a new tab in the background, then used the Export Tab URLs Chrome extension to save each tab to a CSV file. That saved a ton of time over opening each tab and copy/pasting each URL by hand.
In the repo for this project, you’ll see these URLs have been saved as amrc_location_urls.csv.
Generate list of URLs
list_urls = []
csv_file_path = 'amrc_location_urls.csv'
with open(csv_file_path, 'r', newline='', encoding='utf-8-sig') as csv_file:
    csv_reader = csv.reader(csv_file)
    for row in csv_reader:
        list_urls.extend(row)
In order to get the URLs from that CSV ready for batch processing, we need to transfer them to a single list to be looped over. First, we create a variable called list_urls to store the values. Then we set csv_file_path to the name of the CSV file I created. Note that this CSV is simply a single column of those URLs, and stored at the same level in the main directory as the Python file we’re talking about here, so no file path needs to be specified. If you had your own file stored, say, inside a folder, you’d just need to add that folder name to the beginning of the file like folder_name/amrc_location_urls.csv.
Next, we create a context manager using with. The open method then accepts a number of arguments that we specify:
csv_file_pathis the variable we established in the line abovermeans we are granting the script read-only accessnewlinesimply shows that it should interpret each row as its own lineencodingestablishes the encoding of the text format
csv_reader is a built-in method in the CSV library that we imported at the top of the script, which offers a simple way of reading a CSV file. The for loop then creates an iterator we call row, and the code nested inside simply says “for each rows of the CSV file, append that value to the list_urls list.
A crash course on web page structure
In order to understand web scraping, it’s necessary to quickly review how web pages are built before we jump into the next part of the code. If a web page were a house, the HTML code is the frame of that house in that it establishes the structure of the page you see. Different components of sites use specific tags to display a given element, like a section header or an image. Web scraping scripts can look for these tags in order to find the things we want to grab.
If HTML is the structure of a house, CSS is the walls, paint, light fixtures, etc. If you’re going to paint one wall a certain shade of blue, then you want to reuse that same shade for the adjacent wall too. Rather than specify that each time inside your HTML, CSS uses what is referred to as “classes” to recycle that styling. That means if you have a page with two different boxes that are blue, have padding of 5px around them, and a slight drop-shadow effect, you can specify those attributes in your CSS file and assign the HTML that represents those boxes the same class, maybe called “blue-box”. Web scraping can rely on those classes to find what we want.
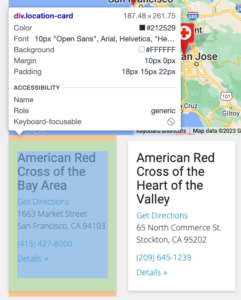
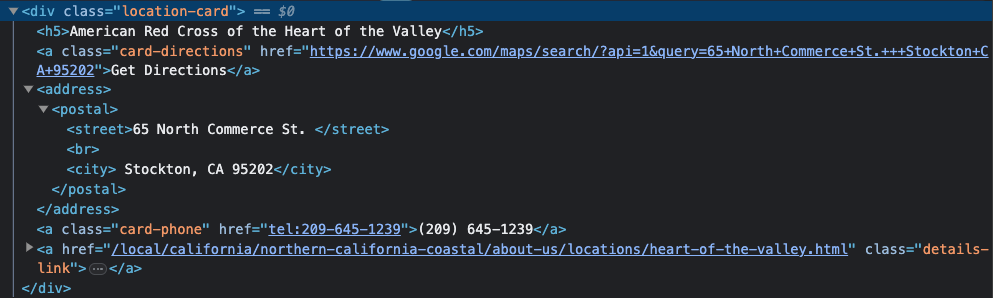
In looking at the source code for one of the pages we’re trying to scrape—you can do this in Chrome by right-clicking on the page, clicking inspect, and then using the element selector tool at the top left of that new pane that opens with the site code—we can see that each location is stored inside a div (a box to hold content in HTML) with a class called, appropriately enough, location-card.
In looking at this, we can see that the <h5> tag holds the name of the site, the <street> tag holds the street address, the <city> tag holds the city, and the <a> tag with a class of card-phone holds the phone number.
In the next section of the code, we’ll see how to use BeautifulSoup to grab this info.
BeautifulSoup scraper
output = []
for url in list_urls:
    print(url)
    response = requests.get(url)

    if response.status_code == 200:
        soup = BeautifulSoup(response.text, 'html.parser')

        # all divs with class="location-card"
        location_cards = soup.find_all('div', class_='location-card')

        for card in location_cards:
            temp_dict = {}

            # location name
            h5_element = card.find('h5')
            if h5_element:
                temp_dict['name'] = h5_element.text

            # street info
            street_elements = card.find_all('street')
            for street in street_elements:
                temp_dict['street'] = street.text

            # city info
            city_elements = card.find_all('city')
            for city in city_elements:
                temp_dict['city'] = city.text

            # phone info
            phone_element = card.find('a', class_='card-phone')
            if phone_element:
                temp_dict['phone'] = phone_element.text

            output.append(temp_dict)
    else:
        print(f"Couldn't find that branch page. Status code: {response.status_code}")
First, similar to how we handled the conversion of the URLs from CSV format to a list, we establish a blank list called output.
Next, we create a for loop to run through each page we pass. Inside this loop we first print the URL (so that we can see in our console as the script is running where we are in the process) and then make an HTTP request with the requests.get() method.
The if checks to make sure the script successfully loads that HTTP (a 200 status code means “success”). The else at the bottom of the code block above will print out the URL that didn’t work, in case we run into any issues.
When the if conditional passes, we begin the web scraping process. soup is a variable where we create a new BeautifulSoup object and pass it a couple of arguments, first to say we’re parsing text, and then that we want to use an HTML parser. See the BeautifulSoup documentation for more information on additional settings.
Next, we drill down in the HTML that the request finds by looking for those location cards. This variable will use the soup object’s find_all method to look for div elements that are assigned the class location-card.
We then create another loop (a loop inside our loop!) to iterate over the elements inside each location card. temp_dict is a temporary dictionary that will be used to store the keys and values of each thing we’re looking for. First, we want the location name, and we grab that by creating an h5_element variable and using the .find() method to find the <h5> tag inside our location-card. If it finds one, we create a new key in our temporary dictionary called name and assign it to the text we find inside the <h5> element. We repeat a similar process for street_elements and city_elements, since these are directly declared tags rather than div elements that have a class assigned. Remember above that the site is structured so that the address is inside <street> tags instead of a (more commonly structured syntax) format like <div class='address'>. The phone number is saved in that way inside a link (represented in HTML as <a>), with a class called card-phone.
After each run of our sub-loop that iterates over all of the location cards, we’ll end up with a temporary dictionary that looks something like this:
{
	name: 'American Red Cross of the Bay Area',
	street: '1663 Market Street',
	city: 'San Francisco, CA 94103',
	phone: '415-427-8000'
}
The output.append(temp_dict) line tacks each one of these dictionaries into our output list.
Optionally geocoding the addresses
if geocoding == True:
    # add your google maps key to a local .env file with key labeled: GOOGLE_MAPS
    load_dotenv()
    google_maps_key = os.environ.get('GOOGLE_MAPS')
    gmaps = googlemaps.Client(key=google_maps_key)

    print("Beginning geocoding process\n------------------\n")

    for place in output:
        joined_address = place['street'] + ' ' + place['city']

        geocode_result = gmaps.geocode(joined_address)
        try:
            place['lat'] = geocode_result[0]['geometry']['location']['lat']
            place['lng'] = geocode_result[0]['geometry']['location']['lng']
        except IndexError:
            place['lat'] = 0
            place['lng'] = 0
After our web scraping is complete, our output variable will be a list of all of these dictionaries. If that’s all you need from the site, you can skip this step. But in my case, I also wanted coordinates so that I could create a simple map of all of the locations. So if you left the geocoding variable at the top of the script as True, then this code block will run.
As a reminder, in order to get this part to work, you need to do two things:
- Create a Google Maps token: Head to the Google Maps Developer portal and create a new project. This guide includes that walkthrough.
- Create .env file: Save the API key that is generated in a local file in the same directory as this project inside a file called
.env(simply create a new file inside the same folder as where you’ve saved your web scraping script and rename it.env). Make sure you label the value in the.envfile as “GOOGLE_MAPS”, put the key inside quotes, and don’t include any spaces. For example:GOOGLE_MAPS='pp91YrT54SyDl1asdf84JJJ73sdf1M'
In the block above, first we run load_dotenv(), which connects your project to that .env file you generated. You did this instead of simply pasting your token directly inside the script so as to avoid sharing it if you end up saving this code on GitHub or directly with a colleague. Remember, your token is private and should never be shared.
Next, the google_maps_key variable is created which grabs your secret token that you generated and stored in your .env file. Then the gmaps variable creates a client with the Google Maps library we imported earlier, passing that secret key as an authentication method. This client is what is going to handle the requests we send off to Google’s servers.
The for loop is where we’ll iterate over our list of addresses that we scraped in the previous section of code and assigned to our output variable. Remember that list is a series of dictionaries, each with the same set of keys (address, city, etc.) but different values. We’re using place as our iterator, so when you see that inside the loop, it just means “each dictionary we’re processing on each run of the loop”.
Since we saved the street address and the city as separate values, we want to first join them. That’s because when we send some address off to Google to find, we want to give it both of those fields. joined_address concatenates the two values, with a space in between.
Utilize geocode() method and assign results to dictionary
The gmaps.geocode() is referencing the Google Maps client we created earlier, and place is the iterator we created. To better understand what [0]['geometry']['location']['lat'] and [0]['geometry']['location']['lng'] are doing, let’s look at what a single response from the API looks like. Below is what is returned when I pass “Washington, DC” into the geocode() method:
[
    {
        "address_components": [
            {
                "long_name": "Washington",
                "short_name": "Washington",
                "types": [
                    "locality",
                    "political"
                ]
            },
            {
                "long_name": "District of Columbia",
                "short_name": "District of Columbia",
                "types": [
                    "administrative_area_level_2",
                    "political"
                ]
            },
            {
                "long_name": "District of Columbia",
                "short_name": "DC",
                "types": [
                    "administrative_area_level_1",
                    "political"
                ]
            },
            {
                "long_name": "United States",
                "short_name": "US",
                "types": [
                    "country",
                    "political"
                ]
            }
        ],
        "formatted_address": "Washington, DC, USA",
        "geometry": {
            "bounds": {
                "northeast": {
                    "lat": 38.9958641,
                    "lng": -76.909393
                },
                "southwest": {
                    "lat": 38.7916449,
                    "lng": -77.119759
                }
            },
            "location": {
                "lat": 38.9071923,
                "lng": -77.0368707
            },
            "location_type": "APPROXIMATE",
            "viewport": {
                "northeast": {
                    "lat": 38.9958641,
                    "lng": -76.909393
                },
                "southwest": {
                    "lat": 38.7916449,
                    "lng": -77.119759
                }
            }
        },
        "place_id": "ChIJW-T2Wt7Gt4kRKl2I1CJFUsI",
        "types": [
            "locality",
            "political"
        ]
    }
]
That’s a lot of stuff! But we only need the coordinates. For a large search result like an entire city, in addition to information about the admin stack, we’re also getting back coordinates for the centroid, as well as the four corners of the map it would return. What we want is the key called location, which has another dictionary nested inside of it with lat and lng as keys, and the coordinates as values.
Let’s go back to the script and breakdown what we saw earlier: geocode_result[0]['geometry']['location']['lat']. We’re essentially drilling down into the levels that the JSON return has. Think of this like navigating through a folder structure:
geocode_resultis the variable that holds the response. The JSON data above is an example of one run of the for loop’s response from Google.[0]essentially drills down a level. The result we get are wrapped in brackets on the first and last lines ([ ]), and subsetting in this way removes them.['geometry']is the next level to drill into. After[0]in the previous step, there are now five top levels:address_components,formatted_address,geometry,place_id, andtypes. We wantgeometry.['location']is the next key we want from what’s nested insidegeometry.['lat']drills down to our final spot. We repeat this on the next line for['lng']
If the “Washington, DC” search example above had been one of the runs of the for loop, it would have grabbed the coordinates like this: {'lat': 38.9071923, 'lng': -77.0368707}.
Unlike the temp_dict we created in the for loop of the web scraping section, we’re simply assigning the values we find to the place iterator, which means these values will be sent back as additional keys inside each dictionary of output.
Try and except blocks
try and its partner except are used to handle exceptions, which are errors that a script may encounter. The try is what we want the script to do and if it runs into an error, rather than stopping everything and shutting down the loop, it then moves down to the except block.
     except:
        place['lat'] = 0
        place['lng'] = 0
In the case of our geocoding here, an exception may be raised if Google can’t find a particular address. When that exception occurs, we simply pass 0 for both. We can later decide how we want to handle that on the CSV file we generate at the end of this process.
Parse our list of dictionaries and save to CSV
Once the for loop reaches the end of the list of addresses, we will now have a output variable with a bunch of dictionaries. Notice that because we assigned the lat and long values to place in the output variable as part of the for loop while we were geocoding in the previous sectionIf we were to look at that list, it would look something like this:
[
	{
		name: 'American Red Cross of the Bay Area',
		street: '1663 Market Street',
		city: 'San Francisco, CA 94103',
		phone: '415-427-8000',
		lat: 39.5467852,
		lng: -77.78754645
	},
	{
		name: 'American Red Cross of Sacramento',
		street: '53 Capital Street',
		city: 'Sacramento, CA 98842',
		phone: '707-555-8090',
		lat: 38.5469152,
		lng: -73.787598445
	},
    ...
]
The CSV generator looks like this:
keys = output[0].keys()
a_file = open("amrc_branch_locations.csv", "w")
dict_writer = csv.DictWriter(a_file, keys)
dict_writer.writeheader()
dict_writer.writerows(output)
a_file.close()
Set keys as the header
We need to create a header for the two columns we’re about to create in the CSV output. list_coordinates[0].keys() looks at the first dictionary inside the list (remember Python indexes starting at zero, so [0] actually means the first dictionary), and the .keys() method takes our keys since each dictionary in the list has the same keys (lat and lng).
Create writeable file
We have Python generate a new CSV file called output.csv. Since we’ve saved our script inside a specific folder, this new file will be generated in the same folder. open() creates the file, output.csv gives it a name, and "w" grants Python write access (rather than read-only)
Use DictWriter to loop over the list of dictionaries
We create a dict_writer variable to hold the csv module’s DictWriter() method, which takes the file we just created and keys we established above as arguments. dict_writer.writeheader() creates the header row, and dict_writer.writerows(list_coordinates) loops over each value in the dictionaries inside list_coordinates, writing a new row for each lat and lng. Finally, we close the file. Open up the folder where the script is and you should see the coordinates. Since it ran through the list of addresses in order, you could simply copy/paste the two column output.csv file we just created into your original address file as two new columns.
Conclusion
This guide offers one solution to web scraping a list of addresses stored across multiple pages of a national society website. However, each site will be structured differently, so you’ll need always inspect the HTML to better understand what elements are storing the data you’re looking for. Reach out to the data-science channel on the SIMS Slack if you need help with this process!