
Web scraping can be a useful way to get data that is presented as text on a site. We have other articles that cover the process of using BeautifulSoup4 to grab that data, but this post will focus more on how to automate the running of your script so that it can continue to periodically grab updated data.
Scenario
As part of the Brazil Floods response in 2024, SIMS was asked to start collecting and managing the impact statistics that various sources were beginning to publish. One source was the Brazilian government’s website for the event which was updated several times a day with figures on people killed, injured, displaced, missing, and more. As these numbers were used in a variety of information products by SIMS, we needed a way to keep a running log of the figures as they were updated with clear timestamps.
Considerations before starting
This solution includes two important technical areas: building a Python script that can crawl the specified site and grab the figures, and using a cloud service like Amazon Web Services (AWS) to manage the process of triggering the script and saving the data. You will need an AWS account if you want to follow along with the process of hosting and running the script. The steps outlined in this article could be adapted to other similar providers like Microsoft (Azure) or Google (Google Cloud) as they offer similar services.
Local requirements
Before we get going, we need to validate that a few things are already installed on your computer, including Python, the PIP package manager, and a couple of packages that will integrate into the script.
Verify that Python and PIP are installed
See this guide to make sure your Python interpreter is set up correctly and that you have the package manager PIP installed.
Building the script
As I developed this script, I ran it inside a virtual environment. There are more comprehensive guides available on how and why you want to do this, but in a nutshell, you would:
- Create a new text file called
lambda_function.pyand save it in a folder. - Open your command line tool and navigate to that folder (use
cd <directory_path>to get there). - Run
python3 -m venv venvto create the environment. The firstvenvtells it you want to create a virtual environment, and the second just tells it to name the environment that same name. - Activate the environment with
source venv/bin/activate - Install the dependencies with
pip install requests beautifulsoup4 boto3 python-dotenv– there are other dependencies we’ll import into the script but they are part of Python’s standard library.-t .
Now your command line prompt should include (venv) in it to indicate that the environment is active.
You can find the completed repo in GitHub, and here’s the complete script for reference as we walk through it:
import requests
from bs4 import BeautifulSoup
import re
import csv
from datetime import datetime
import boto3
import os
from botocore.exceptions import ClientError
from dotenv import load_dotenv

load_dotenv()

def lambda_handler(event, context):
    """
    AWS Lambda handler function to scrape data from a Brazilian government webpage, extract relevant information on impact stats,
    and append it to a CSV file stored in an S3 bucket.

    This function performs the following steps:
    1. Sends a GET request to the Defesa Civil site (Brazilian Government).
    2. Parses the HTML content using BeautifulSoup4.
    3. Extracts specific figures related to the shelters, displaced people, affected people, injuries, missing people, confirmed deaths, and rescues.
    4. Appends the extracted data, along with the current datetime, to a CSV stored in memory.
    5. Uploads the updated CSV file to a specified S3 bucket in the American Red Cross ISD account (name stored in .env file).

    Parameters:
    event (dict): AWS Lambda event data (not used in this function).
    context (object): AWS Lambda context object (not used in this function).

    Returns:
    dict: Dictionary with status code and message indicating the result of the operation.

    Raises:
    Exception: If page cannot be retrieved, the function returns an error message with the status code.
    """

    url = "https://defesacivil.rs.gov.br/defesa-civil-atualiza-balanco-das-enchentes-no-rs-22-5-18h-664f353266e07"

    response = requests.get(url)

    if response.status_code == 200:
        soup = BeautifulSoup(response.content, 'html.parser')

        # the syntax of the page is a little wonky, inside <li> tag with space colon space then the figure
        def get_number_after_label(label):
            label_text = f"{label}:"
            element = soup.find(string=lambda text: text and label_text in text)
            if element:
                parent = element.parent
                text = parent.get_text()
                match = re.search(rf"{label_text}\s*([\d.,]+)", text)
                if match:
                    number = match.group(1).replace('.', ',')
                    return number
            return "Element not found"

        municipios_afetados = get_number_after_label("Municípios afetados")
        pessoas_em_abrigos = get_number_after_label("Pessoas em abrigos")
        desalojados = get_number_after_label("Desalojados")
        afetados = get_number_after_label("Afetados")
        feridos = get_number_after_label("Feridos")
        desaparaceidos = get_number_after_label("Desaparecidos")
        obitos = get_number_after_label("Óbitos confirmados")
        pessoas_resgatadas = get_number_after_label("Pessoas resgatadas")

        current_datetime = datetime.now().strftime("%Y-%m-%d %H:%M:%S")

        data = [
            current_datetime,
            municipios_afetados,
            pessoas_em_abrigos,
            desalojados,
            afetados,
            feridos,
            desaparaceidos,
            obitos,
            pessoas_resgatadas
        ]

        csv_file = "/tmp/defesa_civil_data.csv"
        bucket_name = os.environ.get('bucket_name')
        s3_key = 'defesa_civil_data.csv'

        s3_client = boto3.client('s3')

        # check if the file exists in the bucket
        try:
            s3_client.head_object(Bucket=bucket_name, Key=s3_key)
            file_exists = True
            s3_client.download_file(bucket_name, s3_key, csv_file)
        except ClientError as e:
            if e.response['Error']['Code'] == '404':
                file_exists = False
            else:
                raise

        header = [
            "Datetime",
            "Municipalities affected",
            "People in shelters",
            "Displaced",
            "Affected",
            "Injured",
            "Missing",
            "Dead",
            "Rescued"
        ]

        with open(csv_file, mode='a', newline='') as file:
            writer = csv.writer(file)
            if not file_exists:
                writer.writerow(header)
            writer.writerow(data)

        s3_client.upload_file(csv_file, bucket_name, s3_key)

        print(f"Municipalities affected: {municipios_afetados}")
        print(f"People in shelters: {pessoas_em_abrigos}")
        print(f"Displaced: {desalojados}")
        print(f"Affected: {afetados}")
        print(f"Injured: {feridos}")
        print(f"Missing: {desaparaceidos}")
        print(f"Dead: {obitos}")
        print(f"Rescued: {pessoas_resgatadas}")

        return {
            'statusCode': 200,
            'body': 'CSV file updated and uploaded to S3 successfully.'
        }
    else:
        print(f"Failed to retrieve the webpage. Status code: {response.status_code}")
        return {
            'statusCode': response.status_code,
            'body': 'Failed to retrieve the webpage.'
        }
Import the packages
import requests
from bs4 import BeautifulSoup
import re
import csv
from datetime import datetime
import boto3
import os
from botocore.exceptions import ClientError
We import the packages we installed with pip earlier, as well as several others. Here’s what each does:
requests: A library for making HTTP requests and managing the response. This is what is going to connect to the webpage for us.BeautifulSoup: A library for scraping data from the HTML that is returned. We are aliasing asbs4becauseBeautifulSoupis annoying to write.re: For doing “regular expressions”, which is essentially just a tool for search and manipulating text.csv: For saving the output to a CSV file at the end of the process.datetime: We use this for timestamps.boto3: An Amazon library that makes working with S3 buckets a breeze.os: Short for “Operating System”, this helps us connect to and manage files directly.ClientError: A submodule of boto3, we import a class calledClientErrorfor managing any errors in communicating with AWS.
Create the function
AWS Lambda needs a function to trigger, so we create lambda_handler(). While this function can be called anything, this name we’ve given it is a best practice.
Make GET request and read result
url = "https://defesacivil.rs.gov.br/defesa-civil-atualiza-balanco-das-enchentes-no-rs-22-5-18h-664f353266e07"

response = requests.get(url)

if response.status_code == 200:
The url variable holds the URL of the site we want to scrape. response then uses the library’s get method to fire off the request and store the response. Finally, we start a conditional to check that the request was successfully processed (the 200 status code means everything went okay, so if we get that back, we can enter this next block).
Use BeautifulSoup to parse the website
soup = BeautifulSoup(response.content, 'html.parser')

        # the syntax of the page is a little wonky, inside <li> tag with space colon space then the figure
        def get_number_after_label(label):
            label_text = f"{label}:"
            element = soup.find(string=lambda text: text and label_text in text)
            if element:
                parent = element.parent
                text = parent.get_text()
                match = re.search(rf"{label_text}\s*([\d.,]+)", text)
                if match:
                    number = match.group(1).replace('.', ',')
                    return number
            return "Element not found"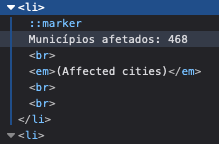
We create the variable soup to hold the BeautifulSoup class and specify the response content from the variable in the previous section. We specify that the format of the data it will be looking at is html with the second argument.
By creating a get_number_after_label function, we create a repeatable code block to be used multiple times as we loop through the various data points we’re trying to extract. Before we get into the details of this function, let’s take a quick peek at the HTML of the page we’re scraping. In the screenshot, you’ll see the page is using a list (the <li> and </li> tags indicate that the contents are a list item.
We’re going to call this function several times for a number of these labels, which we’ll see further down the script. It accepts a label which we pass it, and then adds a colon to it, calling that label_text. Then, we create element and we use the .find() method to search for that label. The string= is using a lambda function (not related to the AWS resource called “Lambda”), which is essentially an anonymous, single line function. In this case its iterating through the text to find the label.
The if element conditional block is entered if it does find something, then assigns the parent, which is the HTML enclosing what we’re looking for. Then the .get_text() method gets the text inside of that element. So in the example of the screenshot above, that means taking that whole string: “Municipios afetados: 468”.
Since the numbers can be of varying length (some figures we look at are three digits long like this example, while others will be longer), we can’t simply slice a static number of characters off the end of the string. The match line uses the re library’s .search() method to find the number at the end of that text.
The rf"{label_text}\s*([\d.,]+)" part requires some unpacking:
rfindicates that we’re looking at a raw formatted string.{label_text}represents all of the text we don’t want here, including the colon. In the screenshot example, that means we want to strip out “Municipios afetados:”.\s*then looks at all whitespace characters. So if a label has one space, two, or more, it will strip those out before looking for the number.([\d.,]+)captures a sequence of digits (\d), periods (.), or commas (,).
Regex is a very powerful syntax for this sort of text manipulation. It can sometime feel a bit cryptic at first, which is why I recommend checking out resources like Regex101.
Finally, the if match conditional block is entered if the previous line found something. The number variable simply converts the number format from dot-separators for thousands to commas. So a number like “400.000” becomes “400,000”.
Run the function for each data point
municipios_afetados = get_number_after_label("Municípios afetados")
pessoas_em_abrigos = get_number_after_label("Pessoas em abrigos")
desalojados = get_number_after_label("Desalojados")
afetados = get_number_after_label("Afetados")
feridos = get_number_after_label("Feridos")
desaparaceidos = get_number_after_label("Desaparecidos")
obitos = get_number_after_label("Óbitos confirmados")
pessoas_resgatadas = get_number_after_label("Pessoas resgatadas")
We simply call that function a number of times for each label whose accompanying number we want to grab.
Create temporary CSV
current_datetime = datetime.now().strftime("%Y-%m-%d %H:%M:%S")

data = [
   current_datetime,
   municipios_afetados,
   pessoas_em_abrigos,
   desalojados,
   afetados,
   feridos,
   desaparaceidos,
   obitos,
   pessoas_resgatadas
]

csv_file = "/tmp/defesa_civil_data.csv"
bucket_name = os.environ.get('bucket_name')
s3_key = 'defesa_civil_data.csv'

s3_client = boto3.client('s3')
We need to timestamp each run of this script in the output CSV, so we use datetime to get the current time, then format it with strftime.
We create a list called data to hold each variable created by the get_number_after_label.
The csv_file is a temporary csv that will hold the data until we’re ready to send it off to our S3 bucket. Later, when we do that, we’ll need to specify the bucket name. You can hard code the name of your bucket here if you’d prefer, but I’m using the load_dotenv() tool imported at the top of the script to read that name from a secure .env file. If you prefer to use my method, create a file in the same directory as this script called .env (it’s just that extension, nothing in front of the dot) and put a single line: bucket_name="your-bucket-name-here". We create s3_key to specify the name of the file that will be created on the first run and appended to each time it’s updated.
Finally, we create a client to handle the communication with AWS.
Get the existing file
        try:
            s3_client.head_object(Bucket=bucket_name, Key=s3_key)
            file_exists = True
            s3_client.download_file(bucket_name, s3_key, csv_file)
        except ClientError as e:
            if e.response['Error']['Code'] == '404':
                file_exists = False
            else:
                raise
The try block first uses the .head_object() method send a HEAD request to the S3 bucket to check that it and the file in question exist. We use the file_exists variable set to True since we succeeded in verifying that the file is there—we’ll take advantage of that variable later on. Finally inside the try block we use the .download_file() method to grab the csv_file that we want to update. The except block handles any errors we encounter above by silently acknowledging them while allowing the script to continue running.
Prepare header row and update file
        header = [
            "Datetime",
            "Municipalities affected",
            "People in shelters",
            "Displaced",
            "Affected",
            "Injured",
            "Missing",
            "Dead",
            "Rescued"
        ]

        with open(csv_file, mode='a', newline='') as file:
            writer = csv.writer(file)
            if not file_exists:
                writer.writerow(header)
            writer.writerow(data)

        s3_client.upload_file(csv_file, bucket_name, s3_key)
The very first time we run this script, it won’t be able to find the existing CSV file in our S3 bucket to update. So we first define header, which is a simple list of values that we want to use for the header row of the file.
Inside the with block, we first open the file, set it to append-mode ('a'), and define the new line as blank. We create a writer on the file, which is a csv library method to edit these documents.
The if not file_exists is checking the variable we created earlier that tells us if the script found an existing file (it will only not find it the first time we run this). If it is set to False, then we use the .writerow() method to insert the header values, otherwise, we proceed to the .writerow() method to write our new values!
Finally, we use the .upload_file() method to send the updated csv back to our S3 bucket!
Configuring AWS Lambda
Now that we have the script, we need to set up a system to have it trigger automatically for us so it can grab updated figures from the site without us having to run it.
AWS Lambda is a compute service for running code without provisioning a server. Given the extremely lightweight script we wrote above, all we need is for it to run itself without any additional complexity of running a full EC2 instance. There are a few things we need to do to prep our code for this process.
Create deployment package
We already wrote the code above in a virtual environment, but for the sake of getting this package ready, lets start a new folder on our computer for this. Drop your lambda_function.py file in there, then navigate to the folder with your command line tool. To make sure you’re in the right place, run ls and you should only see it return lambda_function.py. Now instead of using pip to install our dependencies into a virtual environment, we’re going to install them directly in this directory at the same level as the python file. Run: pip install requests beautifulsoup4 boto3 -t ..
Once all the files have been installed, we need to create a zip file. In your command line, run zip -r lambda_function.zip .. The -r means “recursive”—essentially telling the computer to zip everything at this level of the directory.
Create Lambda function
Search for Lambda in the search bar inside AWS and click Create to make a new function.
- Select Author from Scratch, then choose Python for your runtime. (It will have a Python version number next to it, but as long as it is Python 3.X this should work fine).
- Upload the ZIP file you created above and set the handler to
lambda_function.lambda_handler.
Create IAM role
AWS has a robust system for managing users, groups, and their permissions with its Identity and Access Management (IAM). Head to IAM in AWS using the search bar.
- We need to create a new role for our Lambda function, so navigate to the IAM console in your browser, click Roles from the left pane, then Create Role.
- Select AWS service under Select Trusted Entity, then choose Lambda.
- On the Permissions page, type AmazonS3FullAccess. For more complex instances, you could create a custom policy which is more secure than this by creating a new JSON file that species which exact permissions this tool should have, but doing so is a but outside the scope of this walk through. It is a valuable thing to understand, though, so I encourage you to read more about the process in the documentation.
- Add the policy and name it (this can help if you create a bunch of policies), otherwise stick with something basic like AWSLambdaS3Admin. Click Create Role.
Attach role to Lambda function
Head back to the Lambda console in AWS.
- Click on the Lambda function you created earlier.
- Select Configuration then Permissions.
- Click Role Name to bring up IAM permissions, then click Attach. Select the one you created above.
Create CloudWatch trigger
We’re almost done, but now we just need a way to automatically run this script. CloudWatch is a tool in AWS for monitoring events and firing off triggers for other tools. Use the AWS search pane to find CloudWatch.
- Create a new rule with the Create button.
- Click on Create Rule then select Event Source.
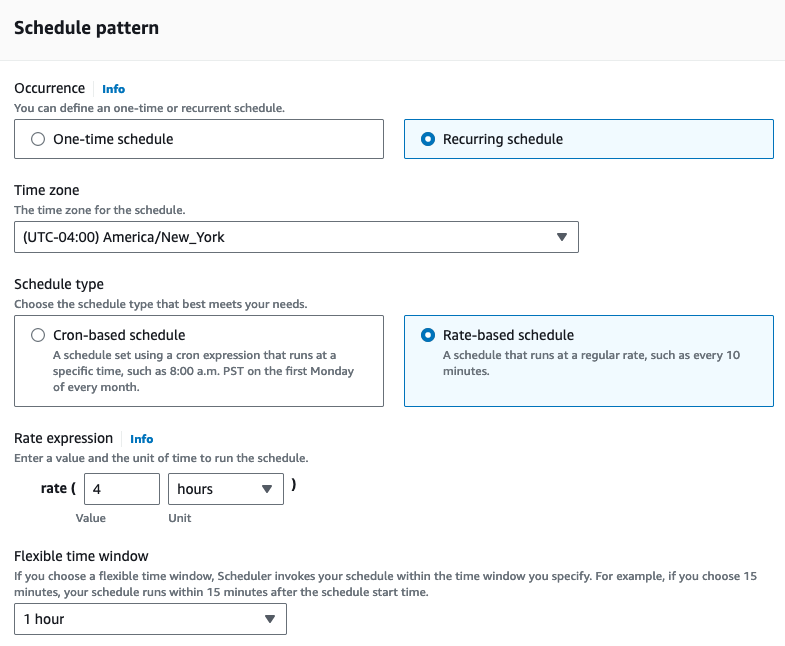
- Choose Schedule.
- We can define the schedule as either Cron or Rate-based. You can use either, depending on your needs. Since I can’t tell how often or when the webpage will be updated, I simply chose to run this every four hours. If you choose a Cron based solution, you can set much more granular schedules with complex logic. If you want to learn more about that syntax, this is a great resource.
And that’s it! Your function should now be running automatically. If you want to download the file from S3, you can either navigate directly to your bucket, or use the command line.
If you choose to go the command line route, you’ll need to install the AWS CLI tool but once you do, you can access the file with: aws s3 cp s3://bucket-name/file_name ~/Desktop.